Mike Mercury main / Mod page / C5 ramps / reducing interior noise / automatic carcover/ham radio
3.42 Carrier Swap
UPDATE at bottom of page
My 2002 Corvette Coupe with A4 transmission was ordered with the G92 3.15 performance axle ratio. I decided to upgrade the car to the 3.42 ratio. Since I have a heated work shop, I decided to DIY the swap. Many thanks to Mike Norris of Norris Motor Sports for his great How-To article published in Corvette Fever magazine; it sure made the process a lot easier. Later I will refer to the article, so here is a link to it:
http://www.corvettefever.com/howto/18978/index.html Also, here are other web sites with very detailed pictures of a similar swaps:
http://www.cajundude.com/differential.htm
http://www.redshift.homestead.com/drivetrain1.html
Thanks to Ed (Patches) and Jason (Cajundude) for spending the time to make it (now) easier for everyone else!
-
First I will post some answers that most always get asked:
1. Did I have to get my PCM reprogrammed for the new rear axle ratio?
There are many reasons to reprogram your PCM when performing a rear axle ratio change on the C5 A4 (manual trans C5's do not require any program changes). One of them is not... repeat... NOT speedometer error. The C5 (whether automatic or manual shift) does not suffer from speedo error when changing the rear axle ratio... PERIOD - END OF STORY.
The first reason to reprogram is to place the WOT shift points back where they will do the most good. There are two parameters that the PCM looks at to command a WOT A4 shift; RPM and MPH. Without a reprogram, you'll probably hit the software rev limiter (6100rpm) before the PCM tells the tranny to shift (because the MPH value hasn't been reached yet). In this occurrence you never will actually get a 1 to 2 shift during WOT because the rev limiter will kick-in before the shift is ordered. Luckily I didn't have this problem. My 2002 LS1 shifted (before ratio change) at around 5600 rpm during WOT. The 3.42 gears raised that to 5900 rpm and I never hit the rev limiter. The 3.15 to 3.42 upgrade is the only ratio change where one might escape the PCM reprog.; depending on the year of the C5 and it's TC's amount of normal slippage. Even the 2.73 to 3.15 change is too great to avoid hitting the rev limiter before the A4 would shift.
The second reason to reprogram the PCM would be to avoid the "P1870" (in 2004 this became the "P0894") slip error-code (that eventually will turn on the check-engine light also). After the rear axle ratio change, the PCM thinks it detects a failing (slipping) torque converter because the RPM at the locked stage is higher than what it thinks should be.. From what I've "heard" (but unable to verify) is that the 2001 and newer factory PCM software will allow 150 rpm of slippage before the PCM is commanded to set the P1870 fault code. The 3.15 to 3.42 upgrade is only an 8.6% change... apparently just under the wire. But, I have also read on the car forums that each torque converter (even the factory one) has it's own unique amount of slippage when locked. And if it slips a little more than normal (but still within spec) you could still set the P1870 error code and eventually get a check engine light. Any other ratio change - even the 2.73 to 3.15 - is well above the 150rpm allowable rate and you will need to have the PCM reprogrammed to stop the P1870 code; regardless of year . I was lucky (again) and did not cause any error codes which allowed me to skip PCM reprograming -WHEW-
After driving a couple of years this way - I decided to buy a programmer anyway; to maximize the shifting, firm up the shifts, and other changes.
2. Did I use a lift?
No. The front was driven up my own design 10" ramps, and the back of the car was on jack stands (placed at the side rear jacking points). The jack stands were set to 16" height and a hockey puck was placed on the top of each to protect the car.
3. How long did it take?
I started on a Saturday and ended the task on the following Saturday. I took my time and did not rush through the job. Total time spent was around 10 hours; I worked about 3 hours at a time, every couple of days. Since I now have experience at this particular job, I think I could perform the carrier swap in 6 hours or less time if I was to do it again. NOTE: see UPDATE at bottom of page.
4. Did you do the job by yourself?
I had the help of a fellow Corvette owner, Greg (schwa72). There are times when muscle was needed and it would be too risky IMO with just one person.
5. Did you retain the stock torque convertor?
Yes (it was a personal choice). A higher stall convertor does not suit my driving style (I do not race), so I decided to use the stock one.
UPDATE; after 6 years I finally upgraded torque converters; read HERE
6. Did my gas mileage suffer any?
Don't know, didn't check, don't care to.
7. How do I determine my C5's rear axle ratio
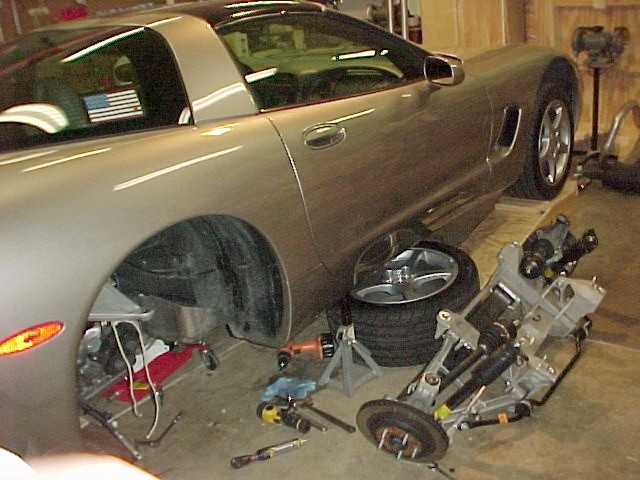
Here a few pics of the work:
The car is not resting on the tires. I slid them under the sides of the car (with room to spare) for added safety in case the car was to fall.
The above pic may be misleading. In order to lower the transaxle assembly this far, the torque tube must be unbolted from... and pulled off of the engine.
Here is what I purchased for the job:
3.42 carrier from L.A.P.D; GM #12551769 (Z06 3.42 GM #12572683)
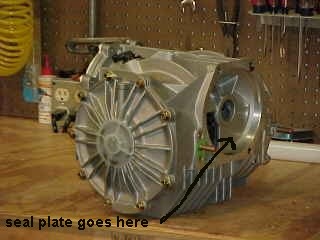
view with A4 seal-plate installed:
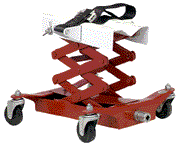
Transmission Jack from Harbor Freight: item 39178-0VGA
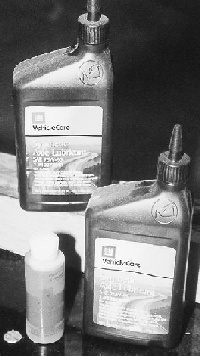
two quarts of GM synthetic rear axle fluid , and limited-slip additive from Fichtner Chevrolet (updated part number below):
Just follow the Mike Norris article and the job is very manageable. All bolts/nuts encountered were metric. I will add my notes below:
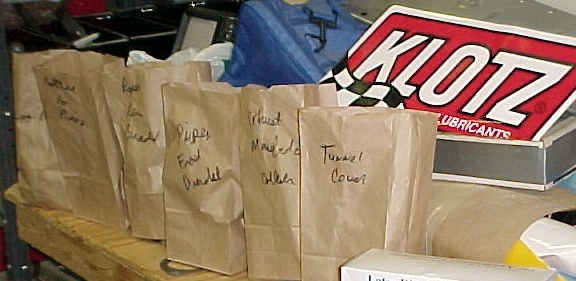
I placed all bolts/nuts into paper bags, labeling where each "set" went. This made reassembly easy since I didn't have to guess which bolt went where.
ref: article "Be sure to disconnect the lines and wires at the differential that will stay put..." Yes, double check this. There are many hold-down points for the wires and brake lines. Follow each one as it snakes across the cradle making sure you unlatch all attachment points. Next, triple check that all wires and brake lines are free from the cradle so you don't damage them when lowering the cradle.
ref: article "Use a jack to support the back of the engine and remove the bolts holding the front of the torque tube to the bellhousing. Lower the transaxle and torque tube..." Before you start the lowering process, measure the distance from the floor to the bottom of the tranny oil pan. You will need to match this measurement later on when reattaching the assembly after the carrier is swapped out. Also; there is a wide wire-harness that fits into metal formed slots on top of the torque tube. The harness must be moved out of the slots before you can lower the transaxle assembly. There are quite a few of these slots, so be sure you get the harness removed from all of them.
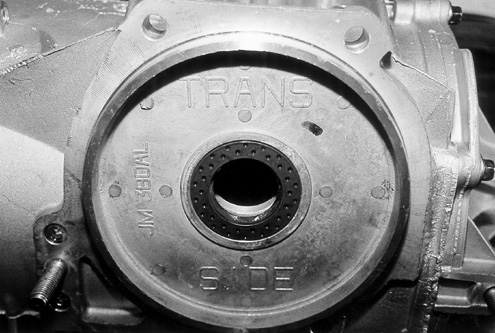
ref: article "Use the seal plate from the old differential or ..." Gosh, this seal plate removal was a bitch . It is a 6" diameter aluminum disk with a seal in the center and an "O" ring around its circumference. I used a small pry bar inserted through the center seal hole and was able to slowly lift it out from the carrier... a little bit at a time. Some may just decide to buy a new one instead of trying to transfer the seal plate from the old to the new carrier. Only automatic trans C5's use the seal plate. 6 speed manual shifts- do not. I would recommend at least replacing the two seals located on the seal plate. Their part numbers are:
Carrier tranny center-shaft seal (A4): 24207010 list $10.96 (newer substitute PN: 24228816 )
Seal Plate O-ring (A4): 12369456 List $10.75
aluminum 6" seal plate (A4): 12369457 List $51.00
The other seals are:
89047953 (new revision) side plate outer "O" ring seal (use with anerobic sealer) List $21.50
88996703 (new revision) output shaft(s) center seal List $18.01
89021677 - diff. fluid with friction modifier (was 12378261 & without modifier)
ref: article "Remember these guys? Now you have to put them back in." I found that you have to get all the cover bolts hand started first, before final tightening.
Obviously I skipped the steps in the article that pertained to the TC replacement and added fluid cooler.
"UPDATE"
it's possible to skip the steps where you unbolt the torque tube assembly from the rear of the engine and slide it backwards off the engines driveshaft. Many have done this now and it works just fine. There is enough "give" in the engine mounts that you simply lower the drivetrain a little amount to gain just enough clearance to slide the carrier off the transmission.
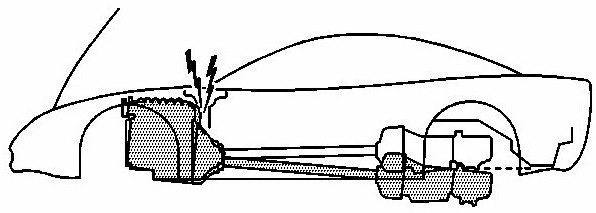
What this diagram shows is the hazard of lowering the driveline too far; to where the back of the engine comes into contact with the firewall (and possibly cracking the fiberglass firewall). You would also want to disconnect the air bridge coupler before the lowering process.
Although I have yet to try this method, I've been told that once you already have the carrier unbolted (and all the electrical wires removed from it as well); using the a tranny jack already under the tranny... slowly lower it while testing if you have acheived enough rearward clearance yet. Once it is lowered just enough to accomplish the slide-off task; don't lower it any more. You also want to check a metal plate behind the LH injector rail - it looks like a guard to keep the firewall from snapping the fuel rail in an accident.